DIY baby gate.
- Becca Clifton

- Jul 8, 2019
- 3 min read
I know what you're thinking. Our baby isn't even here yet and we are already blocking off our stairs. Well here's the deal. Our goldendoodle, Marlee, has recently developed a habit of sneaking upstairs to our bonus room and doing things she knows she's not supposed to be doing. She has been house trained for years, but here in the last few weeks, she'll randomly find her way upstairs and have "accidents."
Our short term solution was a DIY barricade by placing our kitchen chairs in front of the stairs. That worked great until I woke up in the middle of the night and stubbed my toe (still being over dramatic that it's broken) and then Marlee figured out how to move the chairs on her own. She's smarter than we give her credit.

That is when I knew we needed a better, more permanent solution. Sure, I could have bought a standard baby gate (said no DIYer ever). I perused through Pinterest for ideas and then just drew up my own design. Disclaimer: my designs have always been random sketches on paper. One day I might upgrade to pretty electronic design plans, but pen and paper work like a champ for now!
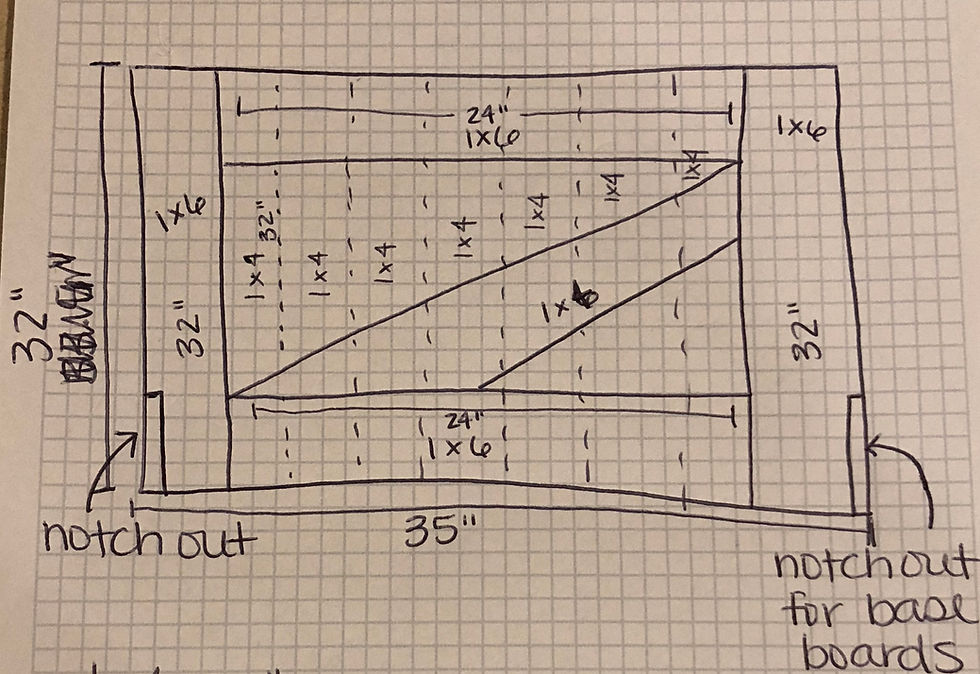
I started by measuring the opening. I had a couple obstacles to work around: hand rail, angled base boards, and an uneven stair. I made the overall width 1" shorter than the actual opening knowing I would do an additional notch out around the base boards. For the height, I made sure it wouldn't rub the handrail or the top of the stair. Also, check the wall where you'll be attaching the gate. If there's a wall stud there then nothing you need to do. If not, you'll need to add a support board and remember to take that out of your measurement of your gate width. Once I got those dimensions, I went to my sketch pad.
The backing is vertical 1x4 boards attached together with wood glue. The trim pieces are 1x6 boards attached with wood glue and a staple gun on the back. Obviously, you'll need to modify your gate to fit your opening, but here is how I did it based on our dimensions.
Materials/tools needed:
(4) 1x4x8 pine board
(2) 1x6x8 pine board
(3) gate hinges
front gate hook (mainly for looks)
back gate hook (used to actually keep child out)
staples
jig saw (only used to notch out around base boards)
paint
paint brush
Step 1: Make your cuts
(10) 1x4 boards at 32" long
(2) 1x6 boards at 32" long
(2) 1x6 boards at 24" long
(1) 1x6 board at 31.5" long (cross piece)

Step 2: Connect the 1x6 trim boards (except the cross piece) in a square with wood glue. Give it some time for the glue to setup an dry.

Step 2: Attach the (10) 1x4 boards in a line with wood glue to the trim boards. If you have clamps, use those for a tighter joint. Then add staples/nails for a stronger hold.


Step 4 (optional): Measure height of base boards and use jig saw to cut out notches.
Step 5: Paint gate. I used a high gloss paint so that it would match the sheen of our baseboards and handrail. I thought 2 coats would be enough, but I ended up painting 3 coats. You need to allow time to dry in between each coat. This will depend on the weather and humidity. Once it's dry to the touch without a "sticky" finish, you're good to go on the next coat.
Step 6: Add cross piece with wood glue. (Confession. I added the cross piece before painting which made the painting more difficult. Learn from my mistake and add cross piece after. You're welcome.)
Step 7: Add hinges and attach to the wall. Make sure you allow room for gate to open and close. Also, we lucked out and had a stud where the gate needed to go. If there's not a wall stud, you'll need to add a support board to the wall.
Step 8: Install gate hooks.

Step 9: Sit back and relax. Your kid(s) and dog are blocked from going where you don't want them to go. Now you can worry about the next thing they are into.


Comments